
Pathway lighting seems straightforward. Put lights along the path. Space them evenly. Done.
But if you have ever driven past a home with pathway lights that looked like a runway strip, or walked down a lit path that still had dark patches between every fixture, you know that execution matters more than the concept.
The layout of your pathway lights, how they are spaced, where they are positioned relative to the path, and how they interact with curves, slopes, and intersections, determines whether the result looks intentional or accidental.
Here is how to get the layout right for driveways, walkways, and everything in between.
The Goal of Pathway Lighting
Before getting into layouts, it helps to be clear about what pathway lighting is supposed to accomplish. It has two jobs.
The first is functional. You need to see where you are walking. Steps, edges, transitions between surfaces, and changes in direction all need to be visible so people can move safely through your property at night.
The second is aesthetic. Pathway lights create lines of light that guide the eye through your landscape. They define the shape of your property, connect zones together, and add a warm glow that makes the whole yard feel intentional.
A good layout accomplishes both at the same time. The path is safe to walk, and it looks beautiful from a distance.
Layout Basics: Spacing and Placement
How Far Apart Should Path Lights Be?
The standard recommendation is 8 to 10 feet between fixtures for most residential path lights. That spacing creates overlapping pools of light on the ground with no dark gaps between them.
But 8 to 10 feet is a starting point, not a rule. The right spacing depends on the output of the fixture, the width of the path, and the surrounding landscape.
A higher output fixture with a wider beam can be spaced farther apart. A lower output fixture with a narrow beam may need to be closer together. If the path is bordered by tall hedges or fences that absorb light, you may need tighter spacing to compensate. If the path runs through an open lawn with no obstructions, the light carries farther and you can spread fixtures out a bit.
The only way to confirm the right spacing is to test it at night. What looks right on paper sometimes needs adjustment in the field.
Which Side of the Path?
You have three options: lights on one side only, lights on both sides, or lights staggered alternately on both sides.
One side only works well for narrow walkways, garden paths, and informal trails through the landscape. It creates a subtle, understated look. The trade-off is that one edge of the path may be dimmer than the other, especially on wider paths.
Both sides, evenly paired creates a formal, symmetrical look. This works well on straight front walkways, entryway paths, and any situation where you want a polished, estate-like feel. The path is evenly lit from edge to edge.
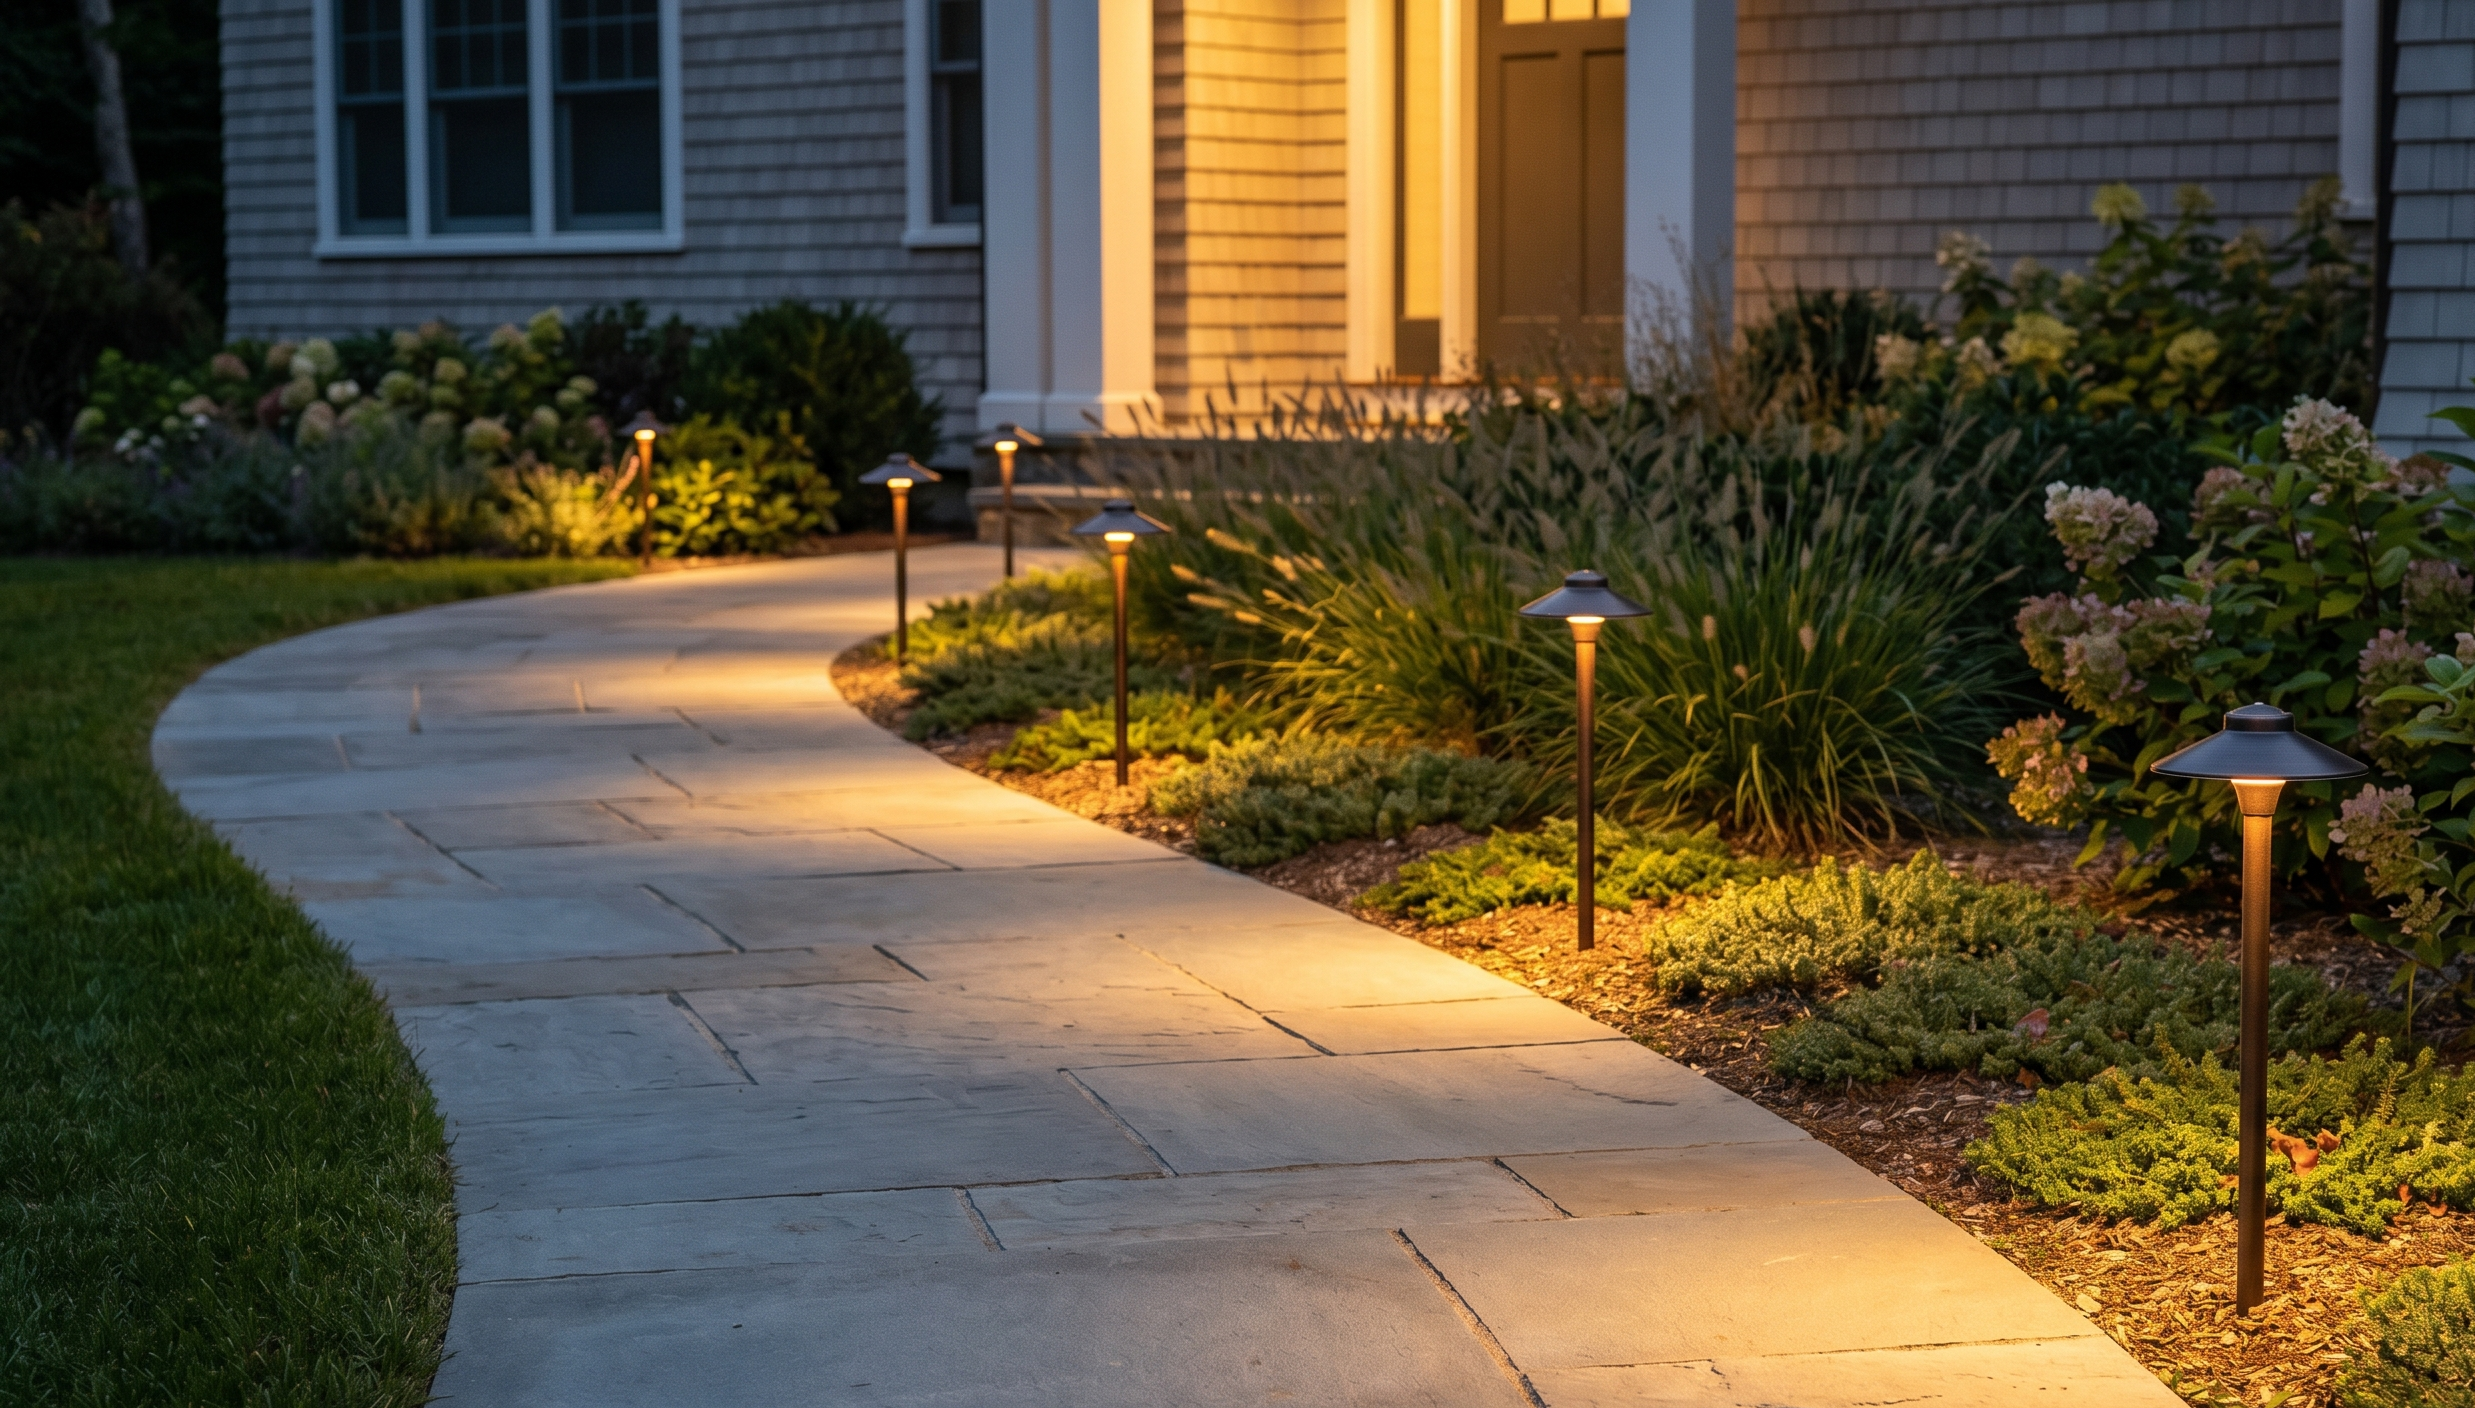
Staggered alternating is the most popular choice for most residential applications. Fixtures alternate left and right as you walk down the path. This creates a natural rhythm that guides the eye forward without the rigidity of matched pairs. It also uses fewer fixtures than doubling up on both sides while still providing even coverage.
Layouts for Long Driveways
Long driveways present a unique challenge. They can be 100 feet or more from the street to the garage, which means a lot of fixtures if you light the entire length. And a straight line of identical lights spaced every 8 feet over 100 feet can look monotonous.
The Staggered Approach
For most long driveways, the staggered alternating layout works best. Fixtures alternate from one side of the driveway to the other, spaced 10 to 12 feet apart. This creates a sense of movement and depth as you drive or walk down the driveway.
Because driveways are wider than walkways, the fixtures need to be positioned slightly off the edge of the pavement, typically 6 to 12 inches into the bordering landscape. This keeps them out of the path of car tires and snow plows while still casting light onto the driving surface.
The Bookend Strategy
If lighting the entire length of the driveway is not in the budget, focus on the two most important zones: the entrance from the street and the area near the garage or front door.
Place two to four fixtures at the mouth of the driveway where it meets the road. This marks the entrance and makes it easy to find at night. Then place another cluster of fixtures at the top of the driveway near the house. The middle section can remain unlit or receive just one or two fixtures to bridge the gap.
This approach uses fewer fixtures but still creates a clear, welcoming arrival experience.
Driveway and Landscape Integration
On properties with mature landscaping along the driveway, you can supplement or even replace path lights with landscape lighting aimed at trees, garden beds, or stone walls along the drive. The spill light from those fixtures often provides enough ambient illumination to see the driveway clearly while adding visual interest that standalone path lights cannot.
This integrated approach looks more natural and avoids the runway effect that a long line of identical fixtures can create.
Layouts for Curved Walkways
Curved paths are more interesting to light than straight ones because the curve itself becomes a design element. The line of light bends and flows, drawing the eye along the path.
Follow the Outside Edge
The most reliable layout for a gentle curve is to place fixtures along the outside edge of the bend. This puts light where the eye naturally looks as you round the curve and highlights the shape of the path.
On an S-curve, the outside edge alternates from one side to the other, which naturally creates a staggered pattern. The fixtures end up on the right side during one bend and the left side during the next, guiding you through each turn.
Tighten Spacing on Sharp Curves
When the path takes a tight turn, reduce the spacing between fixtures in that section. A sharp curve needs more definition than a gentle arc. Closer spacing around the bend makes the turn visible and prevents the dark gap that occurs when fixtures are too far apart on a curve.
Think of it like headlights on a winding road. The straight sections are easy to see ahead. The curves are where you need the most light to stay on track.
Mark Transitions and Intersections
Anywhere two paths meet, the path changes material, or the path transitions to steps, add a fixture. These are the spots where people are most likely to hesitate or misstep, and a light at the transition point removes any ambiguity about where to go or what to expect.
A light at the top and bottom of a short flight of steps, for example, makes the height change obvious even from a distance. A light at a T-intersection where the front walk meets the path to the backyard tells visitors which direction leads where.
Layouts for Front Walkways
The front walkway from the driveway or sidewalk to the front door is the most visible path on your property. It is what guests walk every time they visit. It is what you see in listing photos. It is the path that sets the tone.
Keep It Clean and Balanced
For a straight front walkway, the staggered alternating layout is a safe choice. Three to five fixtures on a typical 25 to 40 foot walkway, alternating sides, spaced 8 to 10 feet apart, provides even coverage without cluttering the path.
If the walkway is flanked by garden beds or low plantings, position the fixtures within the landscaping rather than right at the edge of the pavement. This integrates the lights into the landscape and keeps the walkway itself clean and unobstructed.
Pair With Facade Lighting
Front walkway lighting works best when it is part of a larger plan that includes lighting on the home’s facade. The path lights lead the eye toward the front door, and the facade lights frame the destination. Together, they create a welcoming arrival sequence that feels complete.
Without facade lighting, the walkway lights lead to a dark house, which undercuts the whole effect. Without walkway lighting, a beautifully lit facade has no visual pathway connecting it to the street. The two work as a pair.
Layouts for Side Yards and Connecting Paths
Side yards are the transitions between the front and back of your home. They tend to be narrow, utilitarian, and ignored. But they are the paths you walk regularly, and leaving them dark creates an uncomfortable gap in your lighting plan.
Side yard paths usually work best with a single row of low-profile fixtures along one side, spaced tighter than usual (6 to 8 feet) because the narrow space and tall fences or walls absorb more light. The goal here is not drama. It is simply making the passage safe and comfortable.
If your side yard has a gate, add a fixture near the gate so you can see the latch and the ground at your feet. Small details like this make a real difference in daily use.
Fixture Height Matters
Path light fixtures come in different heights, typically ranging from 12 to 24 inches above the ground. The height affects how the light distributes.
Taller fixtures (18 to 24 inches) cast light over a wider area, which means you can space them farther apart. They also stay visible above low plantings and ground cover.
Shorter fixtures (12 to 15 inches) sit closer to the ground and create a more subtle, intimate glow. They work well in garden paths and areas where you do not want the fixtures to compete visually with the landscaping.
For driveways and front walkways, taller fixtures are usually the better choice because they need to cover more width. For garden paths and backyard trails, shorter fixtures blend in more naturally.
The Runway Effect and How to Avoid It
The runway effect is what happens when identical fixtures are spaced evenly in two straight parallel lines along a path. It looks rigid, institutional, and flat. It is the most common problem with DIY pathway lighting layouts.
You avoid it by introducing variety. Stagger instead of pairing. Mix pathway fixtures with tree uplights and garden bed accent lights along the same route. Vary the spacing slightly (not randomly, but responsively) based on the landscape around the path. Let the path lighting integrate with the broader landscape lighting plan rather than existing as a separate, isolated system.
The best pathway lighting does not look like pathway lighting. It looks like your yard is naturally glowing, and the path just happens to be part of it.
Let Us Design the Right Layout for Your Property
Every property has different paths, different lengths, different curves, and different needs. The layouts that work on your neighbor’s home may not work on yours.
At Serenity Outdoor Lighting, we design pathway lighting as part of a complete plan for your property. Every fixture is placed with purpose, tested at night, and adjusted until the result is exactly right.
Request your free quote or contact us to talk about the paths on your property and how we would light them.